Autossh
简介
autossh 工具是一个用来启动 ssh 服务并进行监控的命令行应用程序,可以在程序出现问题或者发生网络故障的时候,重启 ssh 服务。
内网主机主动连接到外网主机,又被称作反向连接(Reverse Connection),这样 NAT 路由/防火墙就会在内网主机和外网主机之间建立映射即可相互通信了。但这种映射是路由网关自动维持的,不会持续下去,如果连接断开或者网络不稳定都会导致通信失败,这时内网主机需要自动重连机制了。
ssh 仅支持 TCP 端口映射。
如果需要映射的端口不多,只有几个的话,autossh 确实是最佳选择。但是如果需要映射大量端口,建议还是使用类似 Ngrok 的端口映射工具,毕竟这类工具拥有比较完善的管理功能。
安装方式:
使用方式
autossh 使用了系统原生的 ssh 端口映射功能,所以性能开销非常小。
命令使用方式
命令使用参数
| 编号 | 参数 | 含义说明 |
|---|---|---|
| 1 | -M | 用于有问题时就会自动重连;服务器 echo 机制使用的端口 |
| 2 | -D | 本地机器动态的应用程序端口转发 |
| 3 | -R | 将远程主机(服务器)的某个端口转发到本地端指定机器的指定端口 |
| 4 | -L | 将本地机(客户机)的某个端口转发到远端指定机器的指定端口 |
| 5 | -f | 后台运行 |
| 6 | -T | 不占用 shell 终端 |
| 7 | -n | 配合 -f 参数使用 |
| 8 | -N | 不执行远程命令 |
| 9 | -q | 安静模式运行;忽略提示和错误 |
命令使用演示
# 本地端口绑定 (在 host1 服务器上面运行)
# 将所有发送到本机的 31701 端口的所有数据转发到远程主机的 31701 端口
sh -L 0.0.0.0:31701:localhost:31701 root@39.104.58.112 -f -N -o ServerAliveInterval=30
使用 autossh 为如下命令:
# 主要是为了更新安全的运行 ssh 服务

autossh -M 5678 -L 0.0.0.0:31701:localhost:31701 root@39.104.58.112 -f -N -o ServerAliveInterval=30
使用示例
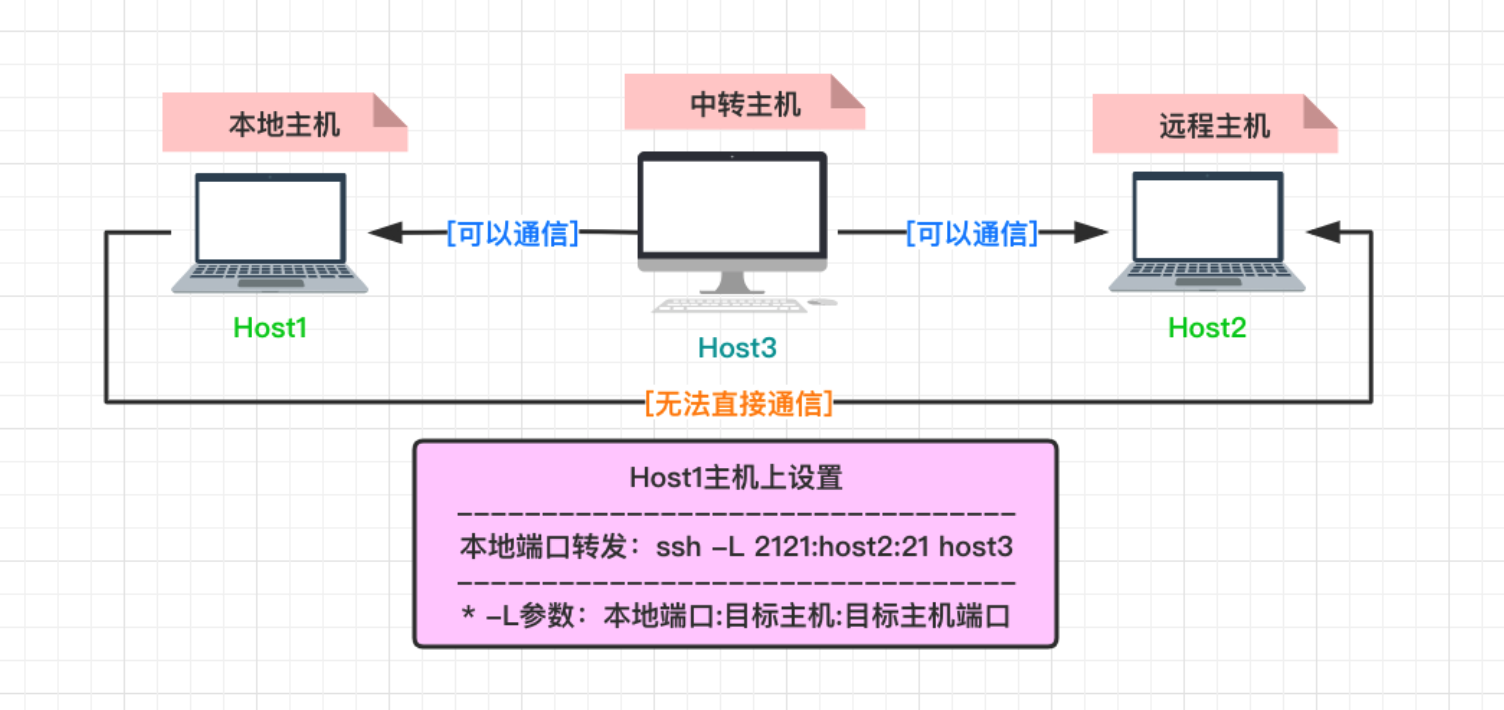
正向转发
本地端口绑定和转发 (-L) => 在 host1 上面设置
将在 host1 主机上开启一个本地侦听的 5900 端口,这样之后,访问本地 5900 端口的流量将转发至 host2 的 8000 端口,其中 -M 参数负责通过 5678 端口监视连接状态,连接有问题时就会自动重连
autossh -M 5678 -fCN -L 5900:localhost:8000 root@host3
autossh -M 5678 -fCN -L 5900:root@host2:8000 root@host3

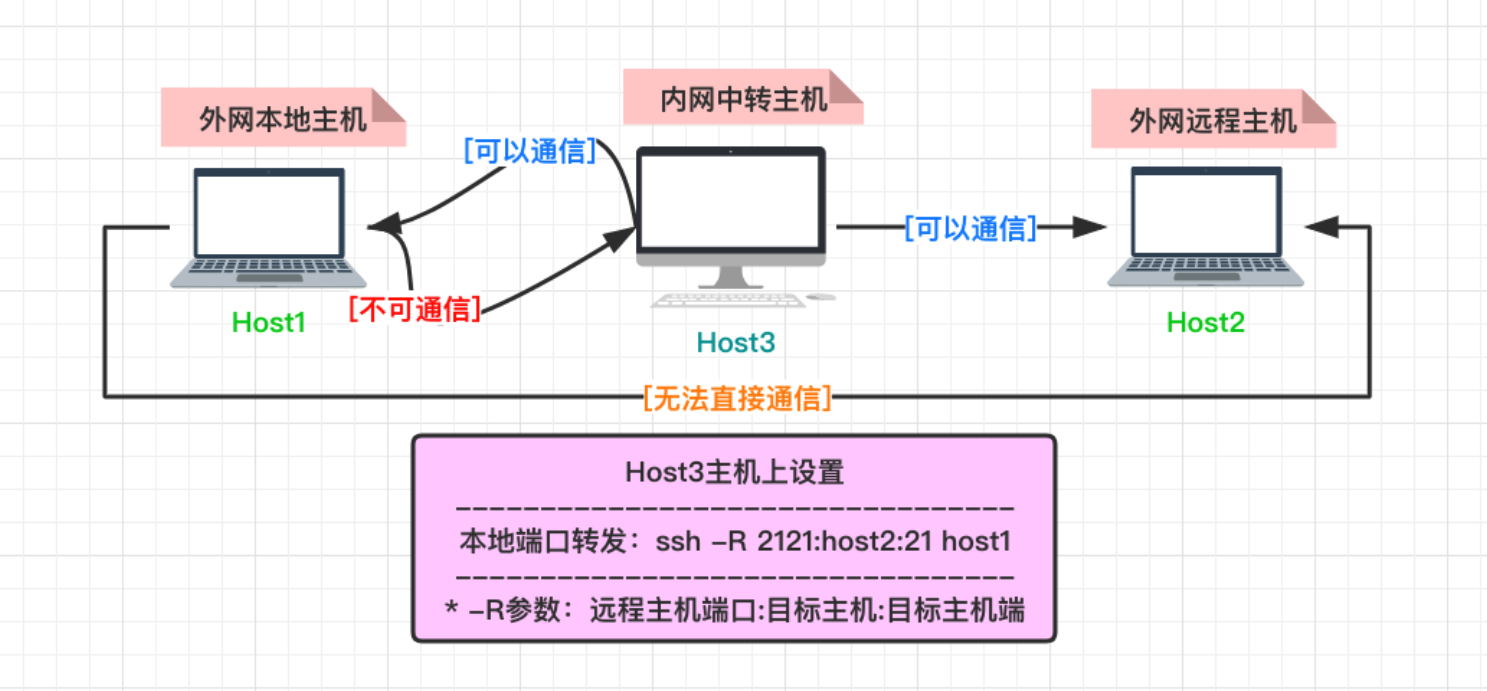
反向转发
远程端口转发功能 (-R) => 在 host3 上面设置
将在 host1 主机上开启一个本地侦听的 5900 端口,这样之后,访问本地 5900 端口的流量将转发至 host2 的 8000 端口,其中 -M 参数负责通过 5678 端口监视连接状态,连接有问题时就会自动重连
autossh -M 5678 -fCN -R 5900:localhost:8000 root@host1
autossh -M 5678 -fCN -R 5900:root@host2:8000 root@host1

动态转发
动态端口转发功能 (-D) => 在 host1 上面设置
开机自启动
在 Ubuntu 或 CentOS 系统中,我们使用 systemd 来管理 autossh 的开机启动问题。
配置很简单,只需要创建一个如下服务启动配置文件,即可。
# /etc/systemd/system/remote-autossh.service
[Unit]
Description=AutoSSH service for remote tunnel
Wants=network-online.target
After=network-online.target

[Service]
Type=simple
Environment="AUTOSSH_GATETIME=0"
User=root
Group=root
WorkingDirectory=/root
ExecStart=/usr/bin/autossh -M 0 -p <port_a> -NR <virtual_port>:localhost:<port_b> <user_a>@<host_a>
KillSignal=SIGQUIT
TimeoutStopSec=5
KillMode=process

[Install]
WantedBy=multi-user.target
编写手动启停脚本
#!/bin/bash
PASS="escapelife"

doexit(){
    expect -c "
    set timeout -1
    spawn $1 -t ps aux |grep escape |grep sshd |awk '{print $2}' |xargs kill -9
    expect {
        \"*?assword:*\" {
            send \"$PASS\r\"
        }
    }
    expect eof
    "
}

dossh(){
    nohup expect -c "
    set timeout -1
    spawn $1
    expect {
        \"*?assword:*\" {
            send \"$PASS\r\";
            exp_continue
        }
    }
    " &
}
使用