CSI
CSI 简介
既然已经有了 FlexVolume 插件了,为什么还需要 CSI 插件呢?上面我们使用 FlexVolume 插件的时候可以看出 FlexVolume 插件实际上相当于就是一个普通的 shell 命令,类似于平时我们在 Linux 下面执行的 ls 命令一样,只是返回的信息是 JSON 格式的数据,并不是我们通常认为的一个常驻内存的进程,而 CSI 是一个更加完善、编码更加方便友好的一种存储插件扩展方式。
CSI 是 Container Storage Interface 的简称,旨在能为容器编排引擎和存储系统间建立一套标准的存储调用接口,通过该接口能为容器编排引擎提供存储服务。
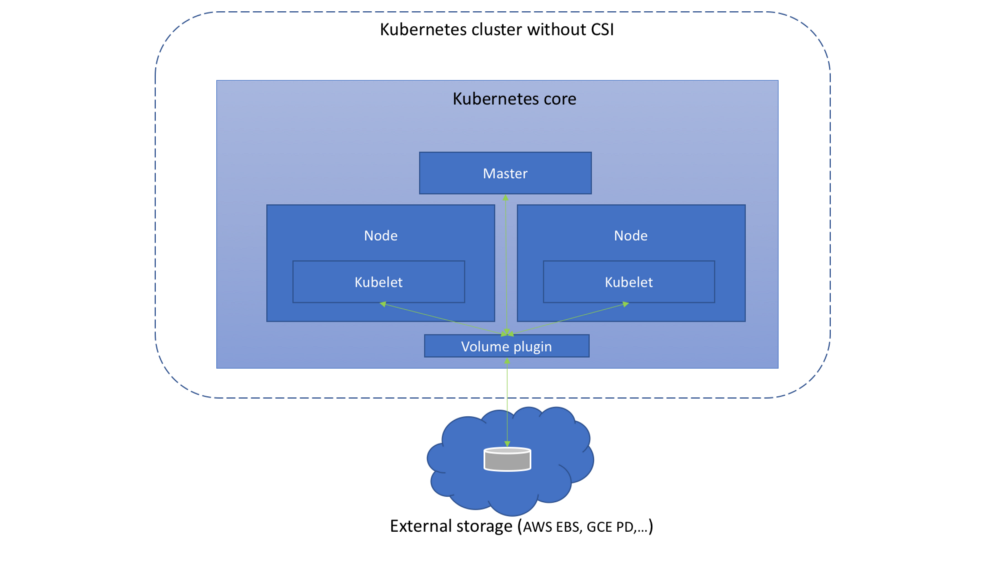
在 CSI 之前,K8S 里提供存储服务基本上是通过 in-tree 的方式来提供,如下图:

这种方式需要将存储提供者的代码逻辑放到 K8S 的代码库中运行,调用引擎与插件间属于强耦合,这种方式会带来一些问题:
- 存储插件需要一同随 K8S 发布
- K8S 社区需要对存储插件的测试、维护负责
- 存储插件的问题有可能会影响 K8S 部件正常运行
- 存储插件享有 K8S 部件同等的特权存在安全隐患
- 存储插件开发者必须遵循 K8S 社区的规则开发代码
基于这些问题和挑战,CO(Container Orchestrator) 厂商提出 Container Storage Interface 用来定义容器存储标准,它独立于 Kubernetes Storage SIG,由 Kubernetes、Mesos、Cloud Foundry 三家一起推动。
CSI 架构
CSI 规范定义了存储提供商实现 CSI 兼容插件的最小操作集合和部署建议,CSI 规范的主要焦点是声明插件必须实现的接口。
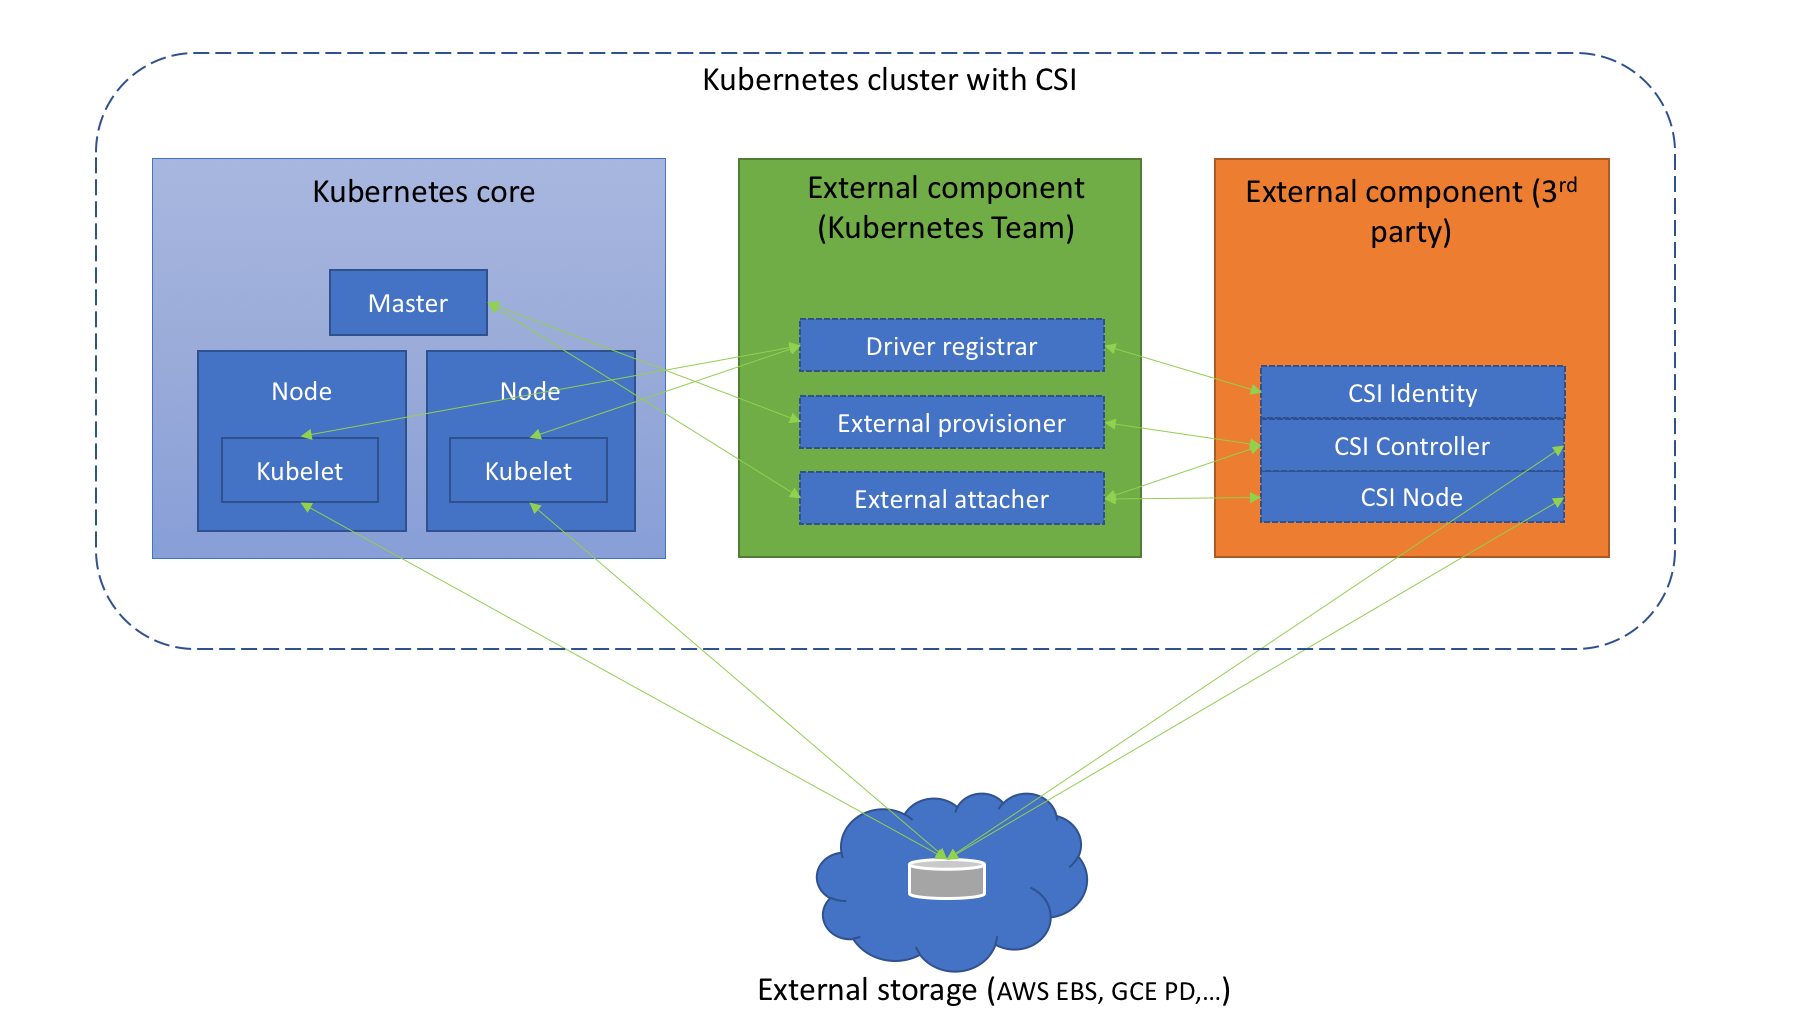
在 Kubernetes 上整合 CSI 插件的整体架构如下图所示:

Kubernetes CSI 存储体系主要由两部分组成:
- Kubernetes 外部组件
- CSI 存储插件
Kubernetes 外部组件
包含 Driver registrar、External provisioner、External attacher 三部分。
这三个组件是从 Kubernetes 原本的 in-tree 存储体系中剥离出来的存储管理功能,实际上是 Kubernetes 中的一种外部 controller,它们 watch kubernetes 的 API 资源对象,根据 watch 到的状态来调用下面提到的第二部分的 CSI 插件来实现存储的管理和操作。
这部分是 Kubernetes 团队维护的,插件开发者完全不必关心其实现细节。
Driver registra:一个 Sidecar 容器,向 Kubernetes 注册 CSI Driver,添加 Drivers 的一些信息External provisioner:也是一个 Sidecar 容器,watch Kubernetes 的 PVC对象,调用对应 CSI 的 Volum e创建、删除等操作External attacher:一个 Sidecar 容器,watch Kubernetes 系统里的VolumeAttachment对象,调用对应 CSI 的 ControllerPublish 和 ControllerUnpublish 操作来完成对应的 Volume 的 Attach/Detach。而 Volume 的 Mount/Unmount 阶段并不属于外部组件,当真正需要执行 Mount 操作的时候,kubelet 会去直接调用下面的 CSI Node 服务来完成 Volume 的 Mount/UnMount 操作。
CSI 存储插件
这部分正是开发者需要实现的 CSI 插件部分,都是通过 gRPC 实现的服务,一般会用一个二进制文件对外提供服务,主要包含三部分:CSI Identity、CSI Controller、CSI Node。
RPC 官方文档:https://github.com/container-storage-interface/spec/blob/master/spec.md#rpc-interface
CSI Identity— 主要用于负责对外暴露这个插件本身的信息,确保插件的健康状态。
service Identity {
    // 返回插件的名称和版本
    rpc GetPluginInfo(GetPluginInfoRequest)
        returns (GetPluginInfoResponse) {}

    // 返回这个插件的包含的功能,比如非块存储类型的 CSI 插件不需要实现 Attach 功能,GetPluginCapabilities 就可以在返回中标注这个 CSI 插件不包含 Attach 功能
    rpc GetPluginCapabilities(GetPluginCapabilitiesRequest)
        returns (GetPluginCapabilitiesResponse) {}

    // 插件插件是否正在运行
    rpc Probe (ProbeRequest)
        returns (ProbeResponse) {}
}
CSI Controller- 主要实现 Volume 管理流程当中的 Provision 和 Attach 阶段,Provision 阶段是指创建和删除 Volume 的流程,而 Attach 阶段是指把存储卷附着在某个节点或脱离某个节点的流程,另外只有块存储类型的 CSI 插件才需要 Attach 功能。
service Controller {
    // 创建存储卷,包括云端存储介质以及PV对象
    rpc CreateVolume (CreateVolumeRequest)
        returns (CreateVolumeResponse) {}

    //  删除存储卷
    rpc DeleteVolume (DeleteVolumeRequest)
        returns (DeleteVolumeResponse) {}

    // 挂载存储卷,将存储介质挂载到目标节点
    rpc ControllerPublishVolume (ControllerPublishVolumeRequest)
        returns (ControllerPublishVolumeResponse) {}

    // 卸载存储卷
    rpc ControllerUnpublishVolume (ControllerUnpublishVolumeRequest)
        returns (ControllerUnpublishVolumeResponse) {}

    // 例如:是否可以同时用于多个节点的读/写
    rpc ValidateVolumeCapabilities (ValidateVolumeCapabilitiesRequest)
        returns (ValidateVolumeCapabilitiesResponse) {}

    // 返回所有可用的 volumes
    rpc ListVolumes (ListVolumesRequest)
        returns (ListVolumesResponse) {}

    // 可用存储池的总容量
    rpc GetCapacity (GetCapacityRequest)
        returns (GetCapacityResponse) {}

    // 例如. 插件可能未实现 GetCapacity、Snapshotting
    rpc ControllerGetCapabilities (ControllerGetCapabilitiesRequest)
        returns (ControllerGetCapabilitiesResponse) {}

    // 创建快照
    rpc CreateSnapshot (CreateSnapshotRequest)
        returns (CreateSnapshotResponse) {}

    // 删除指定的快照
    rpc DeleteSnapshot (DeleteSnapshotRequest)
        returns (DeleteSnapshotResponse) {}

    // 获取所有的快照
    rpc ListSnapshots (ListSnapshotsRequest)
        returns (ListSnapshotsResponse) {}
}
CSI Node— 负责控制 Kubernetes 节点上的 Volume 的相关功能。其中 Volume 的挂载被分成了 NodeStageVolume 和 NodePublishVolume 两个阶段。NodeStageVolume 接口主要是针对块存储类型的 CSI 插件而提供的,块设备在 "Attach" 阶段被附着在 Node 上后,需要挂载至 Pod 对应目录上,但因为块设备在 linux 上只能 mount 一次,而在 kubernetes volume 的使用场景中,一个 volume 可能被挂载进同一个 Node 上的多个 Pod 实例中,所以这里提供了 NodeStageVolume 这个接口,使用这个接口把块设备格式化后先挂载至 Node 上的一个临时全局目录,然后再调用 NodePublishVolume 使用 linux 中的bind mount技术把这个全局目录挂载进 Pod 中对应的目录上。
service Node {
    // 在节点上初始化存储卷(格式化),并执行挂载到Global目录
    rpc NodeStageVolume (NodeStageVolumeRequest)
        returns (NodeStageVolumeResponse) {}

    // umount 存储卷在节点上的 Global 目录
    rpc NodeUnstageVolume (NodeUnstageVolumeRequest)
        returns (NodeUnstageVolumeResponse) {}

    // 在节点上将存储卷的 Global 目录挂载到 Pod 的实际挂载目录
    rpc NodePublishVolume (NodePublishVolumeRequest)
        returns (NodePublishVolumeResponse) {}

    // unmount 存储卷在节点上的 Pod 挂载目录
    rpc NodeUnpublishVolume (NodeUnpublishVolumeRequest)
        returns (NodeUnpublishVolumeResponse) {}

    // 获取节点上Volume挂载文件系统统计信息(总空间、可用空间等)
    rpc NodeGetVolumeStats (NodeGetVolumeStatsRequest)
        returns (NodeGetVolumeStatsResponse) {}

    // 获取节点的唯一 ID
    rpc NodeGetId (NodeGetIdRequest)
        returns (NodeGetIdResponse) {
        option deprecated = true;
    }

    // 返回节点插件的能力
    rpc NodeGetCapabilities (NodeGetCapabilitiesRequest)
        returns (NodeGetCapabilitiesResponse) {}

    // 获取节点的一些信息
    rpc NodeGetInfo (NodeGetInfoRequest)
        returns (NodeGetInfoResponse) {}
}
只需要实现上面的接口就可以实现一个 CSI 插件了。
开发规范
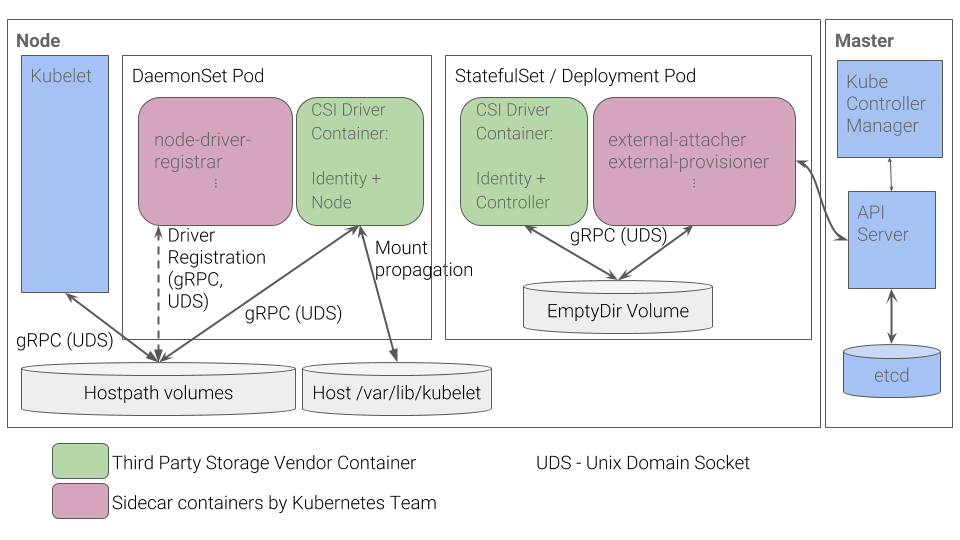
虽然 Kubernetes 并未规定 CSI 插件的打包安装,但是提供了以下建议来简化我们在 Kubernetes 上容器化 CSI Volume 驱动程序的部署方案,具体的方案介绍可以查看 CSI 规范介绍文档 https://github.com/container-storage-interface/spec/blob/master/spec.md

按照上图的推荐方案
CSI Controller负责 Volumes 的创建删除等操作,整个集群只需要部署一个,以 StatefulSet 或者 Deployment 方式部署均可CSI Node部分负责 Volumes 的 attach、detach 等操作,需要在每个节点部署一个,所以用 DaemonSet 方式部署,因为这两部分实现在同一个 CSI 插件程序中,因此只需要把这个 CSI 插件与External Components以容器方式部署在同一个 Pod 中,把这个 CSI 插件与Driver registrar以容器方式部署在 DaemonSet 的 Pod 中,即可完成 CSI 的部署。
比如 Rook 部署的 Ceph 集群就实现了 CSI 插件的:
> kubectl get pods -n rook-ceph |grep plugin
csi-cephfsplugin-2s9d5                                 3/3     Running     0          21d
csi-cephfsplugin-fgp4v                                 3/3     Running     0          17d
csi-cephfsplugin-fv5nx                                 3/3     Running     0          21d
csi-cephfsplugin-mn8q4                                 3/3     Running     0          17d
csi-cephfsplugin-nf6h8                                 3/3     Running     0          21d
csi-cephfsplugin-provisioner-56c8b7ddf4-68h6d          4/4     Running     0          21d
csi-cephfsplugin-provisioner-56c8b7ddf4-rq4t6          4/4     Running     0          21d
csi-cephfsplugin-xwnl4                                 3/3     Running     0          21d
csi-rbdplugin-7r88w                                    3/3     Running     0          21d
csi-rbdplugin-95g5j                                    3/3     Running     0          21d
csi-rbdplugin-bnzpr                                    3/3     Running     0          21d
csi-rbdplugin-dvftb                                    3/3     Running     0          21d
csi-rbdplugin-jzmj2                                    3/3     Running     0          17d
csi-rbdplugin-provisioner-6ff4dd4b94-bvtss             5/5     Running     0          21d
csi-rbdplugin-provisioner-6ff4dd4b94-lfn68             5/5     Running     0          21d
csi-rbdplugin-trxb4                                    3/3     Running     0          17d
这里其实是实现了 RBD 和 CephFS 两种 CSI,用 DaemonSet 在每个节点上运行了一个包含 Driver registra 容器的 Pod,当然和节点相关的操作比如 Mount/Unmount 也是在这个 Pod 里面执行的,其他的比如 Provision、Attach 都是在另外的 csi-rbdplugin-provisioner-xxx Pod 中执行的。